MadeToTag - Optimizations in seven steps
With the InDesign plugin MadeToTag, an accessible, PDF/UA-compliant PDF can be created in seven guided steps. Tedious touch-up work after the PDF export can be minimized or completely eliminated.
The MadeToTag panel #
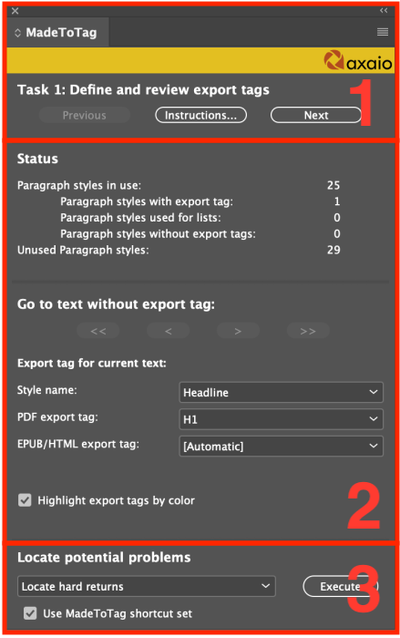
After installing the plugin, InDesign receives an additional panel that can be shown or hidden in the Window menu.
- in the upper area of the panel is the navigation to switch between the seven task steps.
- the middle area is dynamic. The actual task step is completed here.
- the lower part of the panel contains scripts that support accessible output.

The seven steps are explained below:
- Define and review export tags
- Structure content into articles
- Alternate Text
- Review Document Metadata
- Language
- Table structure
- Create tagged PDF file
Step 1: Define and review export tags #
How to assign an export tag to a paragraph format is explained in the article: “Defining PDF tags in InDesign”. MadeToTag gives you an additional way to accomplish this task.
In InDesign, only the heading tags (H and H1-H6) and the paragraph tag (P) can be assigned. The plugin extends the list of possible export tags by:
Caption(for lists and tables)IndexBlockquote
The Highlight export tags by color checkbox is a valuable control tool. This highlights all content containing an export tag by color. Missing and incorrectly assigned tags can now be easily identified.

Step 2: Structure content into articles #
In order to bring the tagged content into a correct reading order, it is structured in articles (see Defining logical reading order in InDesign).
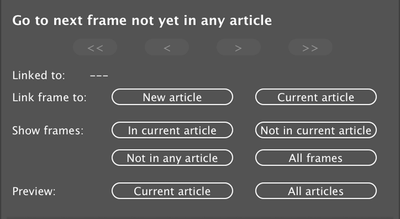
Whether all content has been correctly and completely packed into articles cannot be seen at a glance with InDesign board tools. MadeToTag provides support here with additional features.
Content that is in the currently selected article can be shown and hidden. The not in any article button hides everything that has been assigned to any article. This allows you to check that nothing has been forgotten.

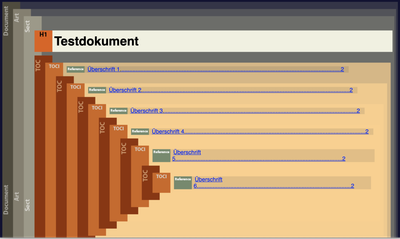
MadeToTag also contains an alternative to the article tab for checking the correct order. The plugin can generate a preview to check the applied export tags and their order.

Step 3: Alternate Text #
All relevant non-text elements require a description text, which is called Alt-Text. “Add alt text in InDesign” describes how this is done in InDesign.
MadeToTag also offers an overview or summary of all images in which missing alt texts can be added or texts can be adapted.
Step 4: Review Document Metadata #
The metadata of the document is entered in InDesign under File info (within the File menu tab).
MadeToTags' step 4 helps you not to forget this step and summarizes the PDF-relevant metadata.
Step 5: Language #
A language is assigned to the text for spell-checking and hyphenation. The correctly assigned language also ensures that assistive technology can output the content correctly. Checking this with InDesign board tools is rather cumbersome. This applies even more to multilingual documents.
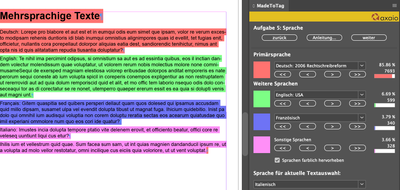
MadeToTag shows you the primary language. This is the language that was used the most in the document. The primary language is used as the document language. If other languages are used in the document in addition to the primary language, these are listed in the MadeToTag tab.
An efficient, visual check can be carried out using the Highlight languages by color checkbox.

Step 6: Table structure #
The table tool is the power feature of MadeToTag. In InDesign, only table headers and footers can be used. The cells of the table header rows are tagged as table headings. Column headings and certainly not complex tables cannot be tagged using board tools.
In addition to PDF/UA-compliant table output, the plugin offers three other structuring tools:
- Quick-Headers: The number of rows and columns from the top and left that are marked up as heading cells are set;
- Smart Headers: This additional tool can be used to implement particularly complex table structures correctly;
- Table is a 'layout table': If tables are misused for layout purposes, this option can be used to prevent output as a table.

Step 7 (Completion): Create tagged PDF file #
Finally, the last output settings are set before the document is exported to a PDF.
The options
- Optimize anchored frames
- Optimize Table Of Contents
can have an influence on the output quality and are important for older InDesign versions.
In addition, individual export presets can be set for PDF generation, similar to the Adobe PDF presets in InDesign, e.g. for regular PDF outputs.
If, in addition to PDF/UA, the PDF/A standard of the PDF to be exported should also be guaranteed, this can be optionally selected.
If a PDF is created using MadeToTag, the InDesign export functionality is used and optimized with various PDF corrections in the background.
Further information on MadeToTag #
This article does not claim to fully describe every MadeToTag option. The online manual from the manufacturer axaio is far more comprehensive and will help with questions or problems.
Further information from the manufacturer axaio: