Defining PDF tags in Word
To improve the output quality of a PDF document exported from Word, it’s important to use the tools in Word correctly. This creates an elementary tag structure and reduces the post-processing effort in the PDF.
The following semantic structure information can be automatically transmitted from Word into the PDF:
In order to transfer this structure information, at the end of this post information about the export settings are provided.
Headings #
One of the most important structure elements are multi-level headings, see also “Structure with the help of multi-level headings”. Such structuring can be achieved by consciously using paragraph styles in Word. If used correctly, headings are automatically exported to the PDF with the appropriate tag.
Word already provides a large styles catalog, including “Heading 1“ to “Heading 9”. Currently, in PDF there are only <H1> to <H6> numbered heading tags available. Therefore, the paragraph styles “Heading 7” to “Heading 9” are mapped with a general paragraph tag (<P>).
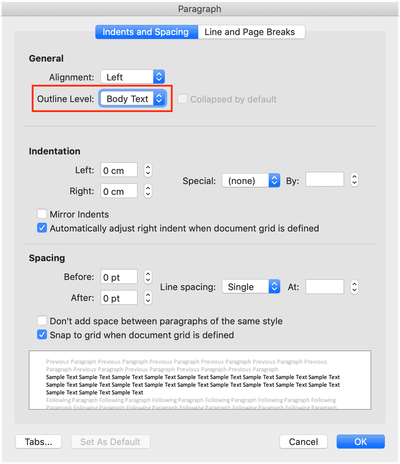
If you want you can use your own paragraph styles and give them the appropriate “Outline Level”. Let’s have a look at this option.
- Open the styles pane. Windows users need to click on a small icon on the bottom right of the Quick Style Gallery.
- Hover over the style you want to change and click on the appearing dropdown menu.
- Click on modify style.
- Go to the paragraph settings with the help of the dropdown menu on the bottom left.
- The second general option is called the outline level. This level will be used to generate the PDF heading tag:
- Body Text =
<P> - Level 1 =
<H1> - Level 2 =
<H2> - Level 3 =
<H3> - and so on
- Body Text =

Lists #
Lists are another important structuring element. It allows you to list several things in a defined or undefined order. To automatically tag lists from Word you have to use the intended list tools.
You can do this with the following buttons:

- The first button creates an unordered list,
- the second an ordered list and
- the third gives you the ability to use a multi level list.
Under the third button for creating a multi-level list hides the possibility to define your own list style. Click on “Define New List Style”. This can be used to define the bullets / numbering and their indentations. In addition, each level can be associated with a paragraph style.
Depending on your Word settings, a hyphen followed by a space is automatically converted to a correct list. However, you should not rely on it and consciously format a list.
The automatically generated list tags are:
<L>= container of the whole list block<LI>= container of a list entry<LBody>= contents of a list entry
PDF actually provides the tag <Lbl> for the bullet / the numbering digit. Word does not do this yet and integrates it into <LBody> as well. The automatic output is therefore not correct but useable. The use of <Lbl> is not mandatory by default.
Tables #
When data is arranged both horizontally and vertically, it belongs into a table. A table should be recognizable not only visually but also by machine. Therefore, it must be created with the table tool provided for this purpose and not only with spaces and tabs.
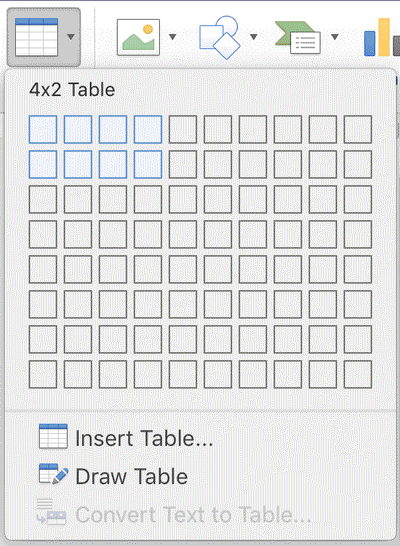
To add a table, click on “Table” in the menu item “Insert”. The appearing pattern can be used to choose how many columns and rows the table should have.

If your cursor is placed somewhere in the table, you’ll see two additional menu tabs. There you have the possibilities to configure your table.
A correct table always contains header cells which are assigned to other cells. The correct tool to add such header cells are the table style options. There are the options
- Header Row
- First Column
- Total Row
- Last Column

Unfortunately, up to and including version 2016, these options only affect the visual formatting, but not the PDF output. In the 365 version, the header cells are automatically tagged correctly. However, these <TH> tags lack the Scope attribute, which indicates whether it’s a header cell for the column or row.
A tutorial to add the Scope attribute is still open.
In earlier Word versions there is a way to have the first line automatically marked with <TH> tags. For this
- the cursor must be placed in a cell of the first row;
- the table properties have to be opened (e.g. via right click);
- the tab “Row” must be opened;
- and the option "Repeat as header row at the top of each page" can be activated.
This way of solving also lacks the Scope attribute in the generated PDF.
Layout grid #
A table shouldn’t be misused as a layout grid as well. If you need multiple columns, there is an option called “Columns” within the “Layout” menu item. With the help of a column break (“Layout” → “Breaks” → “Column”) you switch to another column. With a section break (“Layout” → “Breaks” → “Continuous”) you can switch to another column layout.
Footnotes and endnotes #
The menu tab “References“ contains the commands for adding footnotes and endnotes. The correct command for adding a footnote ensures that the footnote and its reference are dynamic and always on the same page.

The use of the correct commands, however, ensures that the notes are tagged within a Note tag too. Unfortunately the output from Word still isn’t accessible. So far all notes of a page are placed within a single Note tag instead of each separately. Also, the Note tag is listed after the paragraph where the first footnote reference appears. This can lead to a footnote being placed before the corresponding footnote reference. Although PDF 1.7 does not specify exactly where a footnote should be placed, this does not represent an understandable and logical order.
To be more precise, Word does not place the footnotes within a Note tag, but within a
non-standard Footnote. However, Word automatically adds a role mapping entry, which
refers Footnote to the standard compliant Note tag. Learn more in
“General working with PDF tags in Acrobat”
Furthermore, the footnote reference number isn’t automatically tagged within a Reference tag.
Further markup #
Further semantic tags, as listed in “Overview of the PDF tags”, currently cannot be generated automatically from Word.
Export settings #
In order to create the desired tags during PDF export, the following must be observed:
Word for Windows #
- Select “File” → “Export“ → “Create PDF/XPS”
- Click on “Options”
- Activate the option “Document structure tags for accessibility” if it’s not already activated
Word for Mac #
- Select “File” → “Save As”
- Select the option “PDF” in the drop-down “File format”
- Activate the option “Optimal for electronic distribution and accessibility”